HOW
TO:
LISTING CARDS on KRONOZIO.COM USING KRONOCARD
This is from start to finish how to list cards on kronozio.com using Kronocard.
Click on the button that best reflect your situation with Kronozio to skip section that you already know.
Create an account on Kronozio.com

You need to go to Kronozio.com at the top right corner you just click on the Login button.
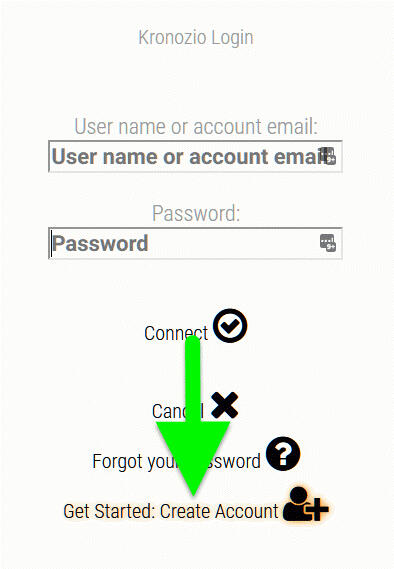
Now in that page you need to click: Create Account.

Here we need you to enter all your information. Don't forget to select your language and under the language please select in the list if you heard about Kronozio from one of our affiliate.

When the registration is submitted, you will receive a confirmation email that is asking to click a link to validate your account.
If after 10 minutes you still don't have that email it may have ended in your spam folder... Look in your spam folder to find it. If not found contact support@kronozio.com and we will manualy activate your account.
The email will look like this. Just click on the orange button in the middle.
When your email is confirmed just click on the Kronozio logo at the top of the web page, it will bring you back to the main page.

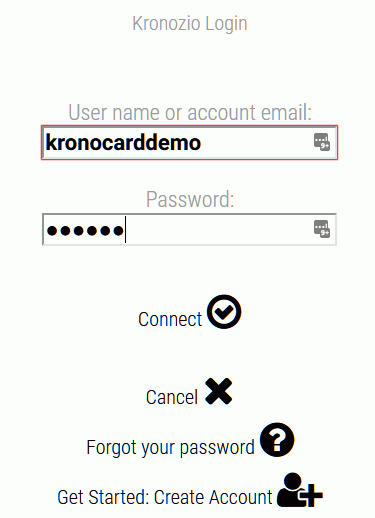
Now you can click on Login this time and in the popup box enter your user name, password and click on the Connect button.

When buying or selling on Kronozio.com or eBay using our connector it's important to fill your profile. After you are logged in click on your user name at the top and click on Profile.

In your profile take the time to accurately fill your address including your country. When done click Save.
Download and install Kronocard

OK it's now time to download kronocard here: Kronocard Download In the Kronocard download page click on the blue button to start the download and come back to the how to.

When the download is complete go double click on the download file. The setup process will start with this interface. You can follow all the next steps by keeping the value to the default.

Last step you can close the setup and start Kronocard.

The first time you open Kronocard it will ask you to select the type of card collection you want to work with. Don't worry you can add and remove card type at any time later. So pick what best for you for the moment. When done click on [Go Kronocard!]

You are now in Kronocard. This image represent the difference between collectors using or not Kronocard to manage their inventory. Click on [It's a Go!]

The first thing you will be asked is to enter your account information you created for Kronozio.com. If you skipped the account creation here is the link to that part:
Account Creation

If your login information are correct you will see this page.

Here you are in the configuration page. At the top left corner you have six buttons representing the 6 steps to complete. Click on the first one the [Store Name].

In that page you are asked to enter a store name and a description. Please only use letters and numbers and try to create an interesting name. For the description you can fill it now or come back at any time to fill it. When done click on [Validate]

Now click on the [Shipping Rules] button at the top. In that page you are asked to enter information about your shipping. Shipping with Kronocard is standard. You have a base price for the envelop with one standard card and four additionnal amounts for each card added to the same envelop. Cards in Kronocard are split in four type, standard, memorabilia (thicker), oversize and graded. Don't worry you can come back at any time to adjust those settings. When done click [Validate].

Now click on the [Payment Methods] at the top. In that interface you will put your PayPal email address. Don't worry we are not asking for your password. If you are also selling local you can select the option to accept other payment method and add the details in the box. If you are not selling local we strongly suggest to only use PayPal. When done click on [Validate].

Click at the top on the [Store Details] button. In that page you can change your store banner that will appear in your Kronozio.com store. You can pick one ready made or create one and select it. Pleas note that to prevent spam on Kronozio.com and to validate the serious of a seller we do not provide store front until you have 100 cards listed on Kronozio.com. After 100 cards you will see your banner, store description and you can create categories on your store. When done click on [Validate].

Click at the top on [Auto Answers]. It will present you with an interface to automatically manage offers when you get too much work to do it manually. When starting we suggest to not use it to receive all offers and decide by yourself. You can come back here at any time to change it. When done click on [Validate].

Last of the six steps click at the top on [Return Policies]. It's always a good idea to offer to buyer to return the card if ever there is something wrong. It create confidence and can bring you more sales in the long term. Please adjust settings and when done click on [Validate].

When all the steps are completed correctly you receive a reward! You get 500 free documentation credits that you can use later to document faster your cards. You're now done and you can start to scan. At any time you can comeback here to modify one of the settings.
Scanning some cards

When you're done with your Kronocard setup you can go click on the top left corner camera icon. Than click again on the camera icon but the tiny one to the right of the Scans label.
If you want a more in depth tutorial on how to scan with a flatbed scanner here is the full tutorial:
Scanning with a flatbed scanner

When you click on that it will minimize the main Kronocard window and open the Kronoscan tool. The part of the software to scan cards.
In page you first select your scanner in the list. You than select the category of card you are scanning.At the bottom it will be displayed where the scanned cards will go in your inventory. In that case in Box labeled FTB0001 in the first row on the left and in the first section.

Now put some cards on the scanner. Important thing to remember. You need to be inside your scanner paper size, you need to leave a little empty space around each card and they need to not touch the border of the scanner.

To start the scanning of the front click on the camera icon on the left.

If everything worked correctly flip your cards without changing their position on the scanner and it the camera icon on the right.

Now take a look at all the images that Kronocard cropped and you can make some adjustment to rotation, cropping or just rescan if they are all wrong :) When done click on the button with a check mark at the bottom.
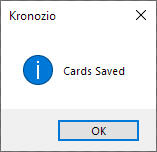
Your cards are now saved in your database. You can continue scanning until your done or you can go back to Kronocard to document them.
Documenting your cards

If you scanned a couple of cards they will now be displayed in the camera icon on the left and the icon box under the magnifier. On the top right corner click on the little grid button.

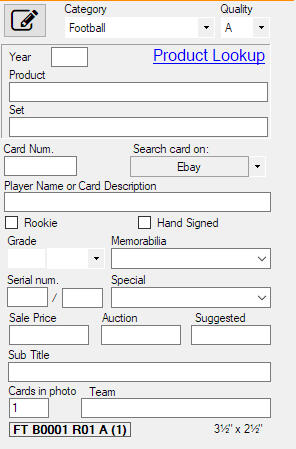
This will open a grid to edit the information for your cards. Each line you select will show you your card image at the top. Enter all the information needed like Year, Product, No. Player/Desc. and the sale price.
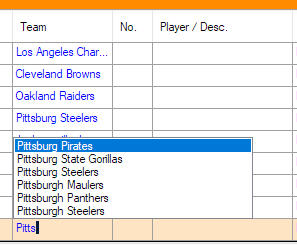
When you do edit your cards information you will see that you get presented suggestion as you type. If the selected suggestion is good for you hit the [TAB] key on your keyboard.
If you're unsure about the value of a card what you can do is select the card in the grid be sure all the card information are entered and on the top right panel hit the button [Ebay]. It will open your default browser and search on eBay with the information you entered for this card. This way you can compare the price. If you click on the arrow to the right of the [Ebay] button you can select other marketplace for prices.

When done you will get someting like this. Note that the suggested column it's free to you to put anything. You can put the Beckett price, market price, the value you paid it's up to you.
Listing your cards on Kronozio.com
Important information! Before starting to list your cards online for sale. It's important that your Kronozio.com profile is completely filed: Not sure? Here is how to do it: Kronozio.com Profile
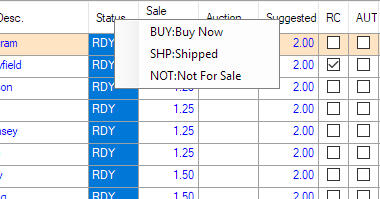
When you're done documenting your cards the status will show RDY that means that all the information needed to list the cards online are entered. Left click on the status column header and right click on it to show the status change menu. Select BUY status. That mean the card will go on sale in your Kronozio.com store!
Hit [Save and close].

If everything goes well you will see a message in your Kronocard message center the letter icon on the left. In the message it will list the cards that Kronocard listed on Kronozio.com. If you click on the [Edit] link it brings you back to the edition of that card. If you click on [View] it will show you the card for sale on Kronozio.com